
Remote Control Vehicles
- HELICOPTERS
- QUADCOPTERS
- Lipo Battery Do's and Don'ts
- How To Prolong The Life of Your LiPo Batteries
- Which Loctite Threadlock colour to use
HELICOPTERS
Affordable Quadcopters and Helicopters have really been taking off over recent years.
Walkera V120D02S RC Helicopter
We recently got our hands on the latest (as at January 2016) Walkera V120D02S and we think it's great for the intermediate flyer.
This is a CP (Collective Pitch) helicopter which is the most difficult type of RC (Remote Control) helicopter to fly as it is FBL (Flybarless). The Flybar helicopters are easier to fly as the flybar gives it more stability.
Tips4U - V120D02S RC Helicopter Servo fix.
Being new to CP helicopters we at Tips4U would say it is impossible not to have a crash. In a relatively short period of time I've broken 2 servos. The Servo is the part of the helicopter which controls arms going up to the main rotor blades adjusting them for horizontal and vertical motion.
Rather than put on a brand new servo we found a way to fix it without buying any new parts using following steps (for the left side servo in this example):
- remove the canopy.
- remove the canopy holder rod. This is a single rod and just slides out of the body.
- remove the servo holder cover. This just lifts off once the canopy rod is removed.
- remove the screw holding the servo bell crank to the servo and pull off the servo bell crank arm (having already removed the top of the ball linkage from the swashplate body base).
- remove the gear cover. This just pulls off, make sure you grip the other end of the servo by the main body and back cover of the servo together so that these don't separate. As you pull it off, press the exposed cog (that was behind the bell crank) so that the cogs don't fall out as the gear cover comes away.
- make a note of how the cogs look (here's a picture of how ours looked).
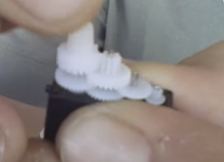
- on our servo it was the cog behind the bell crank top cog that had a tooth broken, we believe that more often than not it is this cog that breaks.
- locate and remove the broken tooth or teeth (we just flicked it out with a needle).
- ease up the whole cog set by pulling them up gently.
- you should now be able to pull the set of cogs with the broken tooth gently to one side away from the cogs next to it. Now rotate it about 180% without turning the other cog sets.
- Reseat the cogs and replace the cover.
- reassemble the servo in the helicopter frame.
- on the receiver board of the helicopter, move the "Adjust" button 2, left to "off". This will stop the gyro working for the next steps.
- unplug the helicopter power cable to the main rotor motor (to make sure you don't accidently start the blades up in the next steps).
- turn on the transmitter and plug in the helicopter battery.
- set the transmitter to "idle up" mode (stunt mode). Set the transmitter sticks to their centre position (eg so that the main rotor blades would be level).
- push the servo bell crank into place on the servo so that it is exactly the same mirror angle of the servo bell crank on the servo on the other side (ie the right one).
- reassemble the helicopter.
- put switch 2 on the receiver back to "on" for the gyros to work again.
- do a test of the action of the servos with the transmitter "Throttle Hold" on.
- get back to happy flying again.
We also found this video that we thought might be useful to watch (not in English):
Hopes this helps
Tips4U - Walkera V120D02S Problems and Solutions
Problem:
Tail drifting right
Remedy:
We found the front gear on the tail drive wasn't tight enough against the gear it connects to on the main drive.
- Loosen off the screw holding the front of the tail shaft in place to the body.
- Push the tail shaft gently forward, holding the rear gear on the tail drive so it doesn't drop out.
- Retighten the holding screw.
- We would assume if this doesn't fix it, the cogs on the gear may be worn and the gear should be replaced.
Problem:
Tail drifting right
Remedy:
The cog at the end of the tail drive (tail end) had rounded off in the hole in the middle of it. It normally has a wedge shape in the hole to fix it securely in the correct position on the tail rod, this was completely rounded. We could identify this by just turning the main shaft gear feeling for resistance at the tail end cog.
We replaced the cog and it flew great again.
Problem:
Bobbing up and down.
Happens unexpectedly and can be either a drop or rise from a steady hover.
Remedy.
The first time we had this problem we found the shaft lock sleeve was loose. Once relocated and tightened for minimal vertical play on the main drive shaft, the problem was solved.
The next time we had this problem we found the front servo was broken. We eventually diagnosed this to be the problem when we tested the movement of the swashplate with the Throttle Hold on. The front servo could be heard and seen to not be working smoothly.
See the tip above to repair this. Click here to go straight to it.
Skyartec Wasp Nano RC Helicopter
This FBL (Flybarless) mini 3D helicopter is the ideal trainer for people who want to learn stunt flying with a CP (Collective Pitch) helicopter.
Here at Tips4U we found this to be a really great starter helicopter to move onto when you've got basic mastery of either quadcopters or FB (Flybar) helicopters.
Pros:
- very cheap
- relatively easy to fly once you get the hang of it
- spares are quite easy to come by and relatively cheap
- ideal to fly indoors. Be prepared for some crashes and damage to the wallpaper, get outside if you don't want any indoor damage. If you're still learning, you will crash
- can do 3d acrobatic movements
Cons:
- not for a total beginner
- somewhat fragile
- weak points in our opinion (we're on our 2nd 3rd helicopter):
- Landing gear
- Tail joint to the helicopter body
- Servos popping out of their mountings
- tail rotor spindle hole easily damaged (unusable after simple damage)
- Tail motor packing up (this is a brushed motor as opposed to the main rotor motor which is brushless)
Have fun if you get one.
Tips4U - Skyartec Wasp Nano RC Helicopter Home Made Protection.
As we say, we've had some problems with the Skyartec Nano Wasp being a little fragile with most crashes. To counteract this we thought we'd try out some home made protection. This has been very cheap to get the bits and pieces to make up the kit and it only took us a couple of hours to set up. Here's a couple of short videos of the end product. If you're interested in more detail drop us an eMail at This email address is being protected from spambots. You need JavaScript enabled to view it.
Tips4U - Skyartec Wasp Nano Protection.
For the next video we added some more framework around the Skyartec Nano Wasp to give it even more protection. You'll see we even took it up to the ceiling.
This works great for indoor hovering practice. If we get enough interest we'll post some detail on how it was made.
Tips4U - Skyartec Wasp Nano Problems and Solutions
Problem:
Helicopter flying uncontrollably.
Remedy:
Option 1: We found one of the servos had come out of body locators holding it in place. This was fairly easy to simply push back into place.
Option 2: The second time we had this problem it was a little trickier to find the cause. After a good look around we found that the feathering shaft had broken. We determined this when holding the head gear (the main blade holders at either end) and feeling that something had snapped in the head gear between the two main blades. We had a spare head set, so simply replaced it.
Later we had a closer look at the broken feathering shaft and it was merely bent. We thought we'd have a go at straightening it. This was straightened quite easily (not perfect, but good enough) by gently tapping it on a solid surface in the correct place with a small hammer. We fitted this to another Skyartec Wasp Nano and it flys very well.
Walkera V450D03 RC Helicopter
We recently added to our collection (as at May 2016) a new Walkera V450D03. This is our first venture into the larger more serious RC helicopters and we're really pleased with it. We think that value for money is extremely good. We only paid £143 (UK Pounds) for it, including postage (have a look around on the internet for the latest prices). This was a BNF model (bind and fly), we already had the Devo 7E controller which works fine with it.
Tips4U - V450D03 RC Helicopter Main Gear stripped due to battery leads in wrong place.
You live and you learn. For one of our first flights having got the new battery for the helicopter, a HEL 11.1V 2600mAh battery, after a short hover the helicopter started making some strange squeeling noises and lost power. We had pretty well completely striped the teeth off the main gear. The reason being we had put the battery connector leads over the front canopy holder strut and they had been rubbing against the main gear teeth for the duration of the flight! A new main gear set was ordered the same day. We'll always be making sure the battery connectors will be put under the canopy strut in the future, well away from the main gear.
Align Trex 150 RC Helicopter
We recently added the Align Trex 150 DFC to our collection of RC Helicopters (as at September 2016). The first reaction was how small it is, we half expected it to be relative to the Walkera V120D02S and so slightly larger. For this reason we thought we'd make a note of this at Tips4U. We'll get it up flying soon but we also quickly stumbled into the problem that although it comes with a battery, which is good, most standard chargers will not connect to it. So our next tip is that if you already have a reasonable Lipo battery charger (we're using an IMAX B6 at the moment) then rather than buy a new charger just get a "Scorpion Backup Guard Charge Cable for Trex 150 [Q-CL-0039]" you should then be able to connect it up and charge it. If you do a search on the internet you should find one of these cables at a reasonable price.
Tips4U - Align Trex 150 might not be as big as you expect.
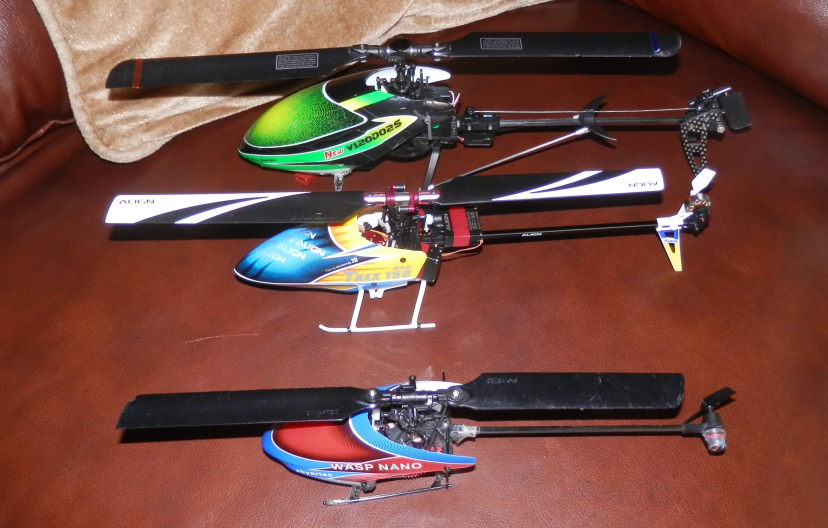 Here's the Align Trex 150 in the middle between the smaller Skyartec Wasp Nano and the larger Walkera V120D02S. The Align Trex 150 doesn't look much bigger than Skyartec Wasp Nano. But even at first glance you can see the quality of the Align Trex 150 looks better. |
 Here's another view of the Align Trex 150 in the middle between the smaller Skyartec Wasp Nano and the larger Walkera V120D02S. It shows a perspective from a few angles. |
Tips4U - Align Trex 150 Problems and Solutions
Problem:
Helicopter flying uncontrollably.
We've had a few minor crashes and inevitably the main blades will still be spinning as the helicopter crashes. There seems to be a general weakness in the point where the screws go into the top swashplate that hold the linkages up to the main rotor blade holders. After a few crashes these screws become very loose and can no longer be tightened securely. They then move around loosely as the helicopter is flying causing the pitch control to become rather erratic and uncontrollable.
Remedy:
Use some super glue to give a good hold of the screw into the upper swashplate. The glue we used was Loctite Super Glue Power Flex Gel Control. Worked a treat and saved us buying a new swashplate.
Problem:
Helicopter vibrating violently.
Remedy:
This was occurring after a fairly heavy crash. On inspection nothing was especially obvious so we stripped the helicopter down suspecting that either the feathering shaft or the main shaft were bent. When rolling the main shaft on a flat surface it could be seen it was slightly bent. We installed a new main shaft and the helicopter was perfect again.
Align Trex 250 RC Helicopter
We added the Align Trex 250 Plus DFC BTF to our collection of RC Helicopters recently (as at December 2016). We did our research on this first to check what size it really was and it's actually about the size of a 200 RC Helicopter. This is a great little helicopter and fits nicely in the category between the tiny micro/mini RC Helicopters and the bigger more serious 450s and above.
The helicopter was advertised to come with a 3GX MRS controller but actually arrived with an Align GPro controller. The GPro is a great little unit. It's a tight fit into its location in the body of the helicopter just above the landing gear.
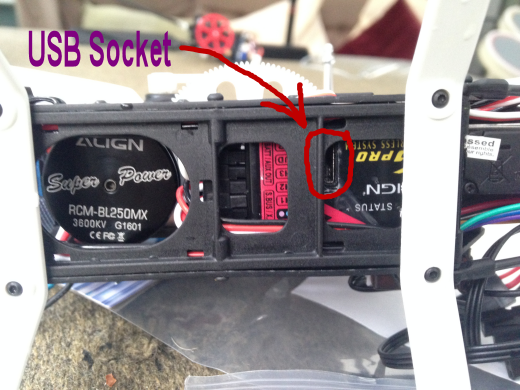
We couldn't resist programming the Align GPro controller ourselves, even though it came programmed ready to go. To do this we needed to do the following first:
- download the Align GPro software
- get a USB cable (normal USB connector one end and mini USB connector the other end)
- get access to the GPro unit usb socket. This was a bit of a problem as we couldn't get to it without partly disassembling the helicopter first, We had to take off the landing skid and the bottom plate.
Rather than go into any more wordy detail here, this is an instruction video for what to do from here on:
This is quite a long video but contains lots of useful information. If you need a summary of the key points relevant to do a simple set up, let us know by emailing us at This email address is being protected from spambots. You need JavaScript enabled to view it. and we'll see if we can get some more information into the website here.
Tips4U - Align Trex 250 Problems and Solutions
Problem:
Screws difficult to undo when needing to do a repair.
After bending the tail in a minor crash we ordered a new tail and thought it looked pretty straight forward to replace it. Unfortunately the tiny screws securing everything are really tricky to get undone and the hex socket head self tapping screws seem to round off pretty easily.
Remedy:
First we tried the trick of trying to loosen any fixing glue that might be holding the screw in place. We held a hot soldering iron against the screw for up to a minute but still no luck in undoing the screw with a hex key.
The trick that did it for us was to use a very small hacksaw blade and saw across the screw head so that a normal small flathead screwdriver could be used. Success! Not always pretty, with some scuffing of the carbon body here and there from the hacksaw blade, but worth it to get the screw out. We could even reuse the original screw.
Another tip worth mentioning here is that once you have got one screw off, it's worth trying the screws nearby again with the hex key. We got one of the screws off holding the fin midway down the tail boom (also known as the Horizontal Stabiliser) using the prescribed method above, then found the other screw on the other side came out OK with the hex key.
When we got to the numerous screws holding the tail boom into the body of the helicopter we found that just undoing the top two screws on one side was enough to enable us to slide out the tail boom. Hope this all helps someone.
Problem:
Tail spinning uncontrollably right.
After careful inspection we finally spotted the problem. When spinning the main gear by hand we could see that the upper cog on the front rear drive gear was not moving (it should spin consistently with the lower cog). We had rounded off the hole on the upper cog so that it would not hold solidly on the metal spline. You can just about see the cogs through the holes in the body of the helicopter without dismantling it.
Remedy:
The obvious remedy would be to get a complete replacement front drive gear and install it. But we like saving money and found the cog could be secured in place with a decent super glue. We used Loctite Super Glue Power Flex Gel Control. Do be careful not to get any of the glue onto the bearing underneath the top cog.
Good luck.
Align Trex 470LP RC Helicopter
We recently added the Align Trex 470LP Super Combo to our collection of RC Helicopters (as at August 2017). We'd been looking for our first full build of a helicopter having previously always bought helicopters that were already assembled. This seemed like the ideal thing, a good size and not hugely expensive (£349 from Align Trex UK).
Tips4U - Align Trex 470LP Unboxing
Here's a video of the opening of the box. Here you'll see our first impressions and a good idea of what you're getting.
Tips4U - Align Trex 470LP Build
Here's a series of videos showing the build of the Align Trex 470LP. This has many useful tips gained from our first build of a remote control helicopter. Many of the tips will be useful at a generic level for any build of a remote control helicopter.
Tips4U - Align Trex 470LP Post Build Findings
Following the first few flights after the build of our Align Trex 470LP we found a couple of teething problems. We thought we'd list them here as they are definitely very useful to know (you always learn from experience, we certainly have).
Finding:
Tailpart not glued and coming undone.
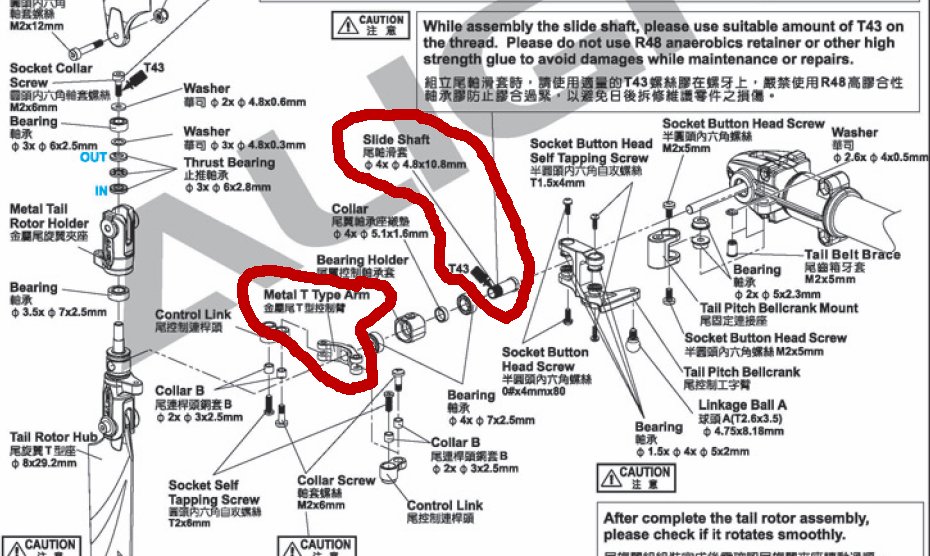
During some early test flying, the helicopter went into a rapid spin without warning. We brought it down a little as best we could while it was spinning uncontrollably, then killed the throttle with the throttle hold. We were fortunate that it came down without damage in some fairly long grass. On inspection, we found that the tail Slide Shaft had come unscrewed from the Metal T Type Arm. It was clearly explained in the build instructions in the manual that this needed to have some blue loctite on it, but we didn't spot this and didn't even realise that this was screwed together (the whole tail setup being preconstructed on the delivered helicopter).
Remedial Action:
We stripped the tail down and simply screwed the Slide Shaft and Metal T Type Arm back together securing it with blue loctite. We'll let you know if we have any more problems with this. For clarity we show the diagram below and have highlighted the parts that came unscrewed.
Finding:
Transmitter/Receiver Range Problem.
During early flying of the helicopter we noticed some odd behaviour and loss of control. We quickly realised we might have a radio transmitter to receiver communication problem. We'll hold our hand up here and say we rather foolishly didn't do a "Range Test" to check what distance we would have good radio communications between the transmitter and the receiver on the helicopter.
The transmitter we were using was a Devention Devo 7e which we'd bought with a Walkera V120D02S RC helicopter. We'd upgraded the firmware on this to use Deviation software so that we could communicate with Spektrum DSM2/DSMX receivers. On our Align Trex 470LP helicopter we'd connected a Lemon RX DSMX satellite receiver. During set up and very early test flights (at quite close range) this seemed to be fine.
Remedial Action:
We proceeded to do a "Range Test" and found it was intermittently failing from about 20 meters. It was odd though that it continued to intermittently work up to about 100 meters. However the fact that it could lose signal at 20 meters was a problem considering flying a helicopter as large as a 470 would mean we were going to want to fly it far beyond a 20 meter distance.
We did further testing with the following findings:
- we found that with a proper Spektrum DSM2/DSMX satellite receiver along with the Devention Devo 7e with Deviation software, it appeared to work fine up to 100 meters
- with a Spektrum Transmitter (we borrowed a DX9) with the Lemon RX DSMX satellite receiver, it appeared to work fine up to 100 meters
- we bought a (supposedly) proper Spektrum DSMX satellite receiver. These were over £40 in the UK at the time (September 2017) but we found one that looked like the real thing for about £20. On testing it with the Devention Devo 7e with Deviation software we found the same problem, that it would not go much further than 20 meters before having communication problems between the transmitter and the receiver. Our guess was that this was NOT a real Spektrum receiver and in fact a Chinese copy, it probably works fine but had a limited range with the Devention Devo 7e with Deviation software
- at this point we thought we'd bite the bullet and purchase a better transmitter
We bought a new Spectrum DX6 transmitter
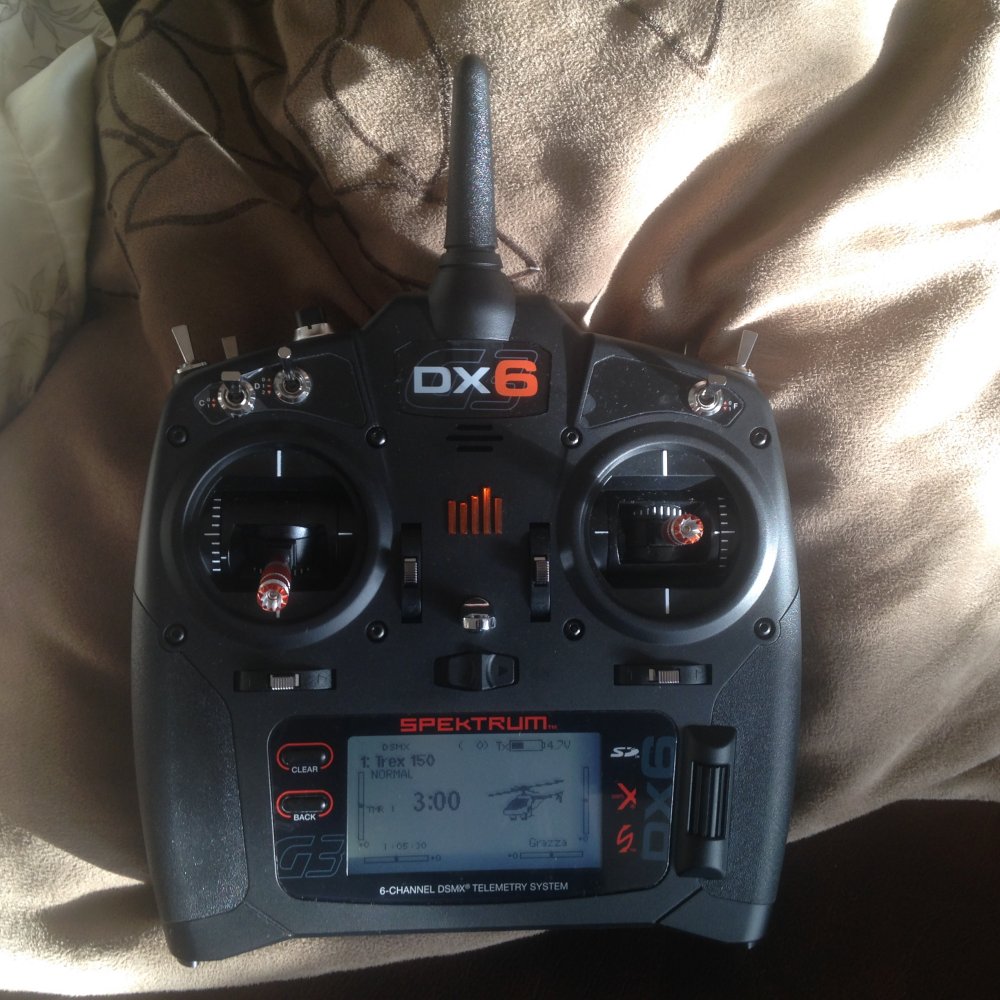
And we're very pleased we did. Rather than pay out £40+ for another Spectrum DSMX satellite receiver, we thought we'd put this money towards a decent transmitter to use with our Align Trex helicopters including the new 470LP. We got this for £185 from "Slough Radio Control Models" here in the UK (price as at September 2017).
Key points:
- transmitter has a dual diversity antenna set up. It has the antenna in the usual place plus another antenna in the handle giving both horizontal and vertical array transmissions. This ensures the best signal is being transmitted
- programmable voice alerts and messages
- lots of programmable switches, 3 of these being three way switches (not sure we'll make use of them all but it's good to have them)
- 250 model memory
- early testing shows it's working great with our cheaper satellite receivers, the Lemon RX DSMX and our cheap copy of the Spectrum DSMX Satellite receiver. If we find out anything else we'll let you know asap
- our other Align Trex helicopters seem to fly rather better with the Spektrum DX6 transmitter, these are the 150 and 250 model helicopters. They just feel to be a bit tamer when needed and more controllable
Blade Nano CPS RC Helicopter
This FBL (Flybarless) mini 3D helicopter is our latest great trainer for people who want to learn stunt flying with a CP (Collective Pitch) helicopter. We got ours in June 2018.
Here at Tips4U we found this to be a really good starter helicopter to move onto when you've got basic mastery of either quadcopters or FB (Flybar) helicopters. But probably the main reason we got this one is that we wanted a small helicopter that we could easily fly in a confined space indoors. This certainly puts a big tick in the box for that!
The Blade Nano CP S features exclusive SAFE (Sensor Assisted Flight Envelope) technology, a revolutionary electronic flight envelope protection system that makes it easy for most people to fly helicopters with some confidence. It has a versatile flight mode system that allows you to choose the right amount of assistance with the flip of a switch. Plus you get the virtual protection of Panic Recovery mode that will instantly recover the heli to a level attitude for you. As a result, learning new moves is more fun which means your skills as a heli pilot will build more quickly.
Three Flight Modes;
- Stability Mode: Limited flight envelope with self-levelling and a low bank angle limit
- Agility Mode: Full control authority with no bank angle limit
- 3D Mode: Turns up the flip and roll rate for 3D capability
Pros:
- reasonably cheap considering it's collective pitch and the flight options it gives you (as noted here)
- pretty easy to fly once you get the hang of it
- spares are quite easy to come by and relatively cheap
- ideal to fly indoors. Be prepared for some crashes and damage to the wallpaper, get outside if you don't want any indoor damage. If you're still learning, you will crash
- can do 3d acrobatic movements
Cons:
- not for a total beginner
- weak points in our opinion:
- Battery seems a bit fiddly to connect sometimes
- Battery life was OK for a few flights but seems to run out of power and a light in the helicopter flashes red after about 3 minutes. (Please note, this was related to the first problem noted in our "Problems and Solutions Section" below).
Have fun if you get one.
Tips4U - Blade Nano CPS Unboxing
Here's a video of the opening of the box. Here you'll see our first impressions and a good idea of what you're getting.
Tips4U - Blade Nano CPS Problems and Solutions
Problem:
Helicopter spins up but won't fly.
The helicopter connects to the transmitter when the battery is plugged in, but when throttle is applied the blades start to spin but at a constant rate (not enough to take off) and the transmitter has absolutely no affect. You couldn't even use the throttle or the hold switch on the transmitter to stop the blades spinning. To stop the blades spinning we had to pick up the helicopter very carefully with the blades still spinning and pull out the battery lead.
One of the odd things about the problem was it was not consistent, sometimes it would be OK and fly as normal, albeit with a limited flight time of about just under 3 minutes. But most times the no control problem was happening.
To start with we thought we had lost the bind between the transmitter and the helicopter and sometimes doing the bind again seemed to work. But again this was inconsistent and did not always fix the problem.
Remedy:
We got a new battery and all was fine (very strange). The helicopter flew absolutely fine every time after we got a new battery for the helicopter.
Problem:
Helicopter drifts. This happened after a bit of a crash.
Remedy:
We found some notes on a sheet of paper that came with the helicopter. We thought it worth adding the details here in case people have lost this sheet of paper.
The helicopter has been calibrated in the factory before shipment, but it is possible that a crash will cause mechanical distortion of the frame, resulting in a slight drift in Stability mode. In this situation please follow the calibration process.
Prior to beginning the calibration procedure, ensure the flight battery and transmitter battery are fully charged and the helicopter and transmitter are properly bound.
Calibration steps.
- Power on the transmitter.
- Raise the throttle to full.
- Set the Flight Mode switch to position 0.
- Power on the helicopter.
- Set the helicopter on a level surface.
If you are using the Ready To Fly transmitter, the receiver LED will change to solid blue, after the helicopter initiates.
If you are using a different transmitter, the receiver LED will flash purple (red & blue together). - Lower the throttle stick to the lowest position.
- If you are using the Ready To Fly transmitter, set the Flight Mode switch to position 1. The receiver LED will begin slowly flashing purple (red & blue together). Proceed to step 8.
If you are using any other transmitter, the LED should already be flashing purple. Do not change the Flight Mode switch. Proceed to step 8. - Raise the Throttle/Collective stick to hover the helicopter. The receiver will rapidly flash purple. Use the minimum amount of cyclic control input to hover the helicopter in one place for approximately 30 seconds.
- Land the helicopter and completely lower the throttle. The receiver LED will again slowly flash purple.
- Unplug the flight battery to save the calibration.
QUADCOPTERS
Here at Tips4U we think quadcopters are the best starter if you fancy trying out the exciting hobby of remote control vehicle flying. The main advantages are that they are relatively cheap, both for the initial purchase and for any spares required, and they are quite robust.
They are not a toy that can just be picked up and played with, you do need to learn the skills of flying them, but this is the fun thing about them, it's a challenge and great fun once you get the hang of it.
Below we talk about a number of the quadcopters available (10th June 2016)
Hubsan Q4 RC Quadcopter
We think the Hubsan Nano Q4 is possibly the best quadcopter to get started with. It's tiny and can be flown quite safely indoors.
Although small, cheap and easy to fly (once you've learnt the basics) it has all the functionality of much bigger more sophisticated quadcopters (or even helicopters). The controller has everything on it to learn the basic controls of maneuvering, up/down, left/right sideways and clockwise/counter clockwise rotation.
The blades do tend to come off when you have a crash, but once you find them (they're so tiny) they are quite rarely broken.
Provided there is very little wind, you can even get outside in the fresh air for some fun flying with the Hubsan Q4.
Hubsan X4 RC Quadcopter
The Hubsan X4 is a great all rounder quadcopter to get started with. It's not as small as the Hubsan Q4 and is probably not quite as robust. We'd advise that you always use the rotor blade guard, this doesn't deter from the fun of flying this one. If you have a major crash the rotor blades can be broken, but without the blade guard the chance of breaking the blades is far greater.
Although this quadcopter is called a Hubsan X4 it comes in a variety of guises which we at Tips4U found quite confusing to start with. Be careful when you buy one and make sure you get the one you really want. The following are the options we are aware of currently (10th June 2016).
- Hubsan X4 - H107L.
This is the basic model. You can do flips and rolls. No camera
- Hubsan X4 - H107D FPV.
This is the most expensive model and has First Person View (FPV) capability which means you can have the onboard camera view visible on a screen on the transmitter. You can do flips and rolls. 0.3MP camera.
- Hubsan X4 - H107C.
This is the version with the option for an HD camera. Beware if you want the best camera quality, there seems to be 2 versions, one with a 0.3MP camera and one with a 2MP camera, obviously the 2MP version will give you better quality video and pictures. You can do flips and rolls.
DJI Quadcopters
In the world of Quadcopters and Drones we think DJI products come pretty well at the top of the pile.
Click here to see our dedicated website page on this topic.
Tips4U - Lipo Battery Do's and Don'ts
Modern Lithium Polymer batteries (LiPo, Li-Poly) are able to store and deliver large amounts of energy from lightweight packs. Think of and treat LiPo batteries as fuel. Lithium Polymer cells, as with any high energy source (petrol, electricity, gunpowder etc) must be handled with appropriate precautions and care. Lithium Polymer batteries have been proven world-wide to be a practical and enjoyable power source for model aircraft. With the exception of a very small number of fires that have resulted directly from a crash, fires have nearly always occurred during charging. These fires have been almost exclusively caused by human error. Therefore the main purpose of this information is: A. To provide information that can help you actively avoid a dangerous charging situation. B. To provide some standard precautions to limit loss or injury in case a fire occurs. As long as you adhere to a few do’s and don’ts when handling, using, charging and storing your cells you should enjoy many hours of trouble free use from your LiPo’s.
Do’s
- Only ever use a charger specifically designed to charge Lithium Polymer cells. Failure to do so may a cause fire, which may result in personal injury and/or property damage.
- Check and double check that you have set the correct voltage/number of cells and the maximum current does not exceed the stated charge rate (normally 1C). If using an automatic charger, check that it has detected the correct number of cells. Check it again through every stage of charging. Do these checks for EVERY charge.
- Keep all batteries out of the reach of children.
- Check the voltage of your LiPo pack before charging with a digital multimeter. Only charge if it is 3.30V or greater per cell (e.g. 9.90V for a 3S pack).
- Only charge in an isolated area away from other flammable materials and on a non conductive and non flammable surface. Use a LiPo Guard bag or use a non-conductive container like a casserole dish with a lid as it will help contain any fire. LiPo battery fires can not be extinguished with water. If a fire occurs, either cover it with sand or better still salt. On no account use water to extinguish a fire. Water acts like petrol on a LiPo battery fire.
- If at any time you see a cell ‘puff up’ disconnect it immediately and either cover it in sand, or put it in a nonconductive container and place it outside away from all flammable objects for at least 30 minutes.
- If charging indoors, only charge with a smoke detector above where you are charging.
- Manually check the temperature of your LiPo battery pack constantly during charging. Unlike other types of cells, LiPo cells should never get warm and should stay at the ambient temperature when being charged. If any of the individual cells become warm/hot compared to the other cells, disconnect it immediately and either cover it in sand, or put it in a non-conductive container and place it outside away from all flammable objects for at least 30 minutes.
- Where ever possible always use a cell balancer when charging. A cell balancer will give you the 1st indication that a single cell within a pack is failing. If one of the LED’s remains on during the charge cycle this is indicating that one of the cells is failing, possible causing other cells in the pack to become over charged, which can result in a fire.
- Store LiPo batteries at room temperature between 5ºC and 27ºC (40ºF and 80ºF) for best results. The lower the temperature the better.
- When connecting 2 packs in series always make sure they are from the same manufacturer, the same capacity, the same age and type and that there is a voltage difference of 0.03V or less.
- When connecting 2 packs in parallel always make sure they are from the same manufacturer, the same capacity, the same age and type and that there is a voltage difference of 0.03V or less, otherwise the higher voltage pack will discharge into the lower voltage pack, which may cause a fire.
- If you plan to store your LiPo cells for an extended period (over 1 month) then discharge them as you would normally. Then charge them to only 3.80-3.85V per cell.
- Physically disconnect batteries from ESC’s with BEC’s to prevent slow over-discharge. The on/off switch does not stop the slow discharge.
- Do ensure connectors are insulated correctly to prevent short circuit in handling or storage.
- Do always check that batteries are physically and electrically undamaged before charge or discharge.
Don’ts
- Do not use a charger that is not specifically designed to charge Lithium Polymer cells.
- Do not leave cells un-attended when charging. You should always remain close to the charging cells to monitor the charging process and react to potential problems should they occur.
- Do not charge LiPo batteries in the model.
- Do not charge LiPo batteries in a vehicle or in the engine compartment of a vehicle.
- Do not carry LiPo batteries in your pocket. They have been known to short against coins and keys and cause fires.
- Do not puncture the cells.
- Do not place LiPo batteries in a fire.
- Do not short the wires of your LiPo cells/battery. This is very dangerous and can cause a fire or even an explosion. If you accidentally short the wires of your LiPo cells/battery, either cover it in sand, or put it in a non-conductive container and place it outside away from all flammable objects for at least 30 minutes.
- In the event of a crash, remove battery(s) and place it/them in a safe open area away from any combustible material for approximately 30 minutes. On no account should you place it in a vehicle for at least 30 minutes as a delayed chemical re-action can occur causing a fire.
- Do not ‘Top up’ your cells. Even if you charged them up to 1 year ago. LiPo cells loose less then 1% of their capacity per month. Just use them and then re-charge them as normal. Over-charging LiPo batteries will damage them and possibly cause a fire.
- Do not charge cells that have been stored in cold conditions (below 10ºC/50ºF), let them warm up (above (10ºC/50ºF), for a minimum of 30 minutes.
- You risk an explosion if you attempt to use cells that have been stored at or below 0ºC (32ºF), Warm them first for at least 60 minutes above 10ºC (50ºF) before charging or discharging.
- Do not store your cells for extended periods of time (more then 1 hour) in a hot place (i.e. in your car on a hot day) as this may cause them to catch fire of even explode.
- Do not ingest contents of LiPo cells. If you do accidentally swallow the contents of LiPo cells seek medical attention immediately.
- Do not charge hot cells. Warm cells are OK, let hot cells cool before charging.
- Do not allow charging to continue above 4.25V per cell. This is VERY important as a fire could result.
- Do not discharge you LiPo cells below 3.00V per cell (e.g. 9.00V for a 3S pack) as this will damage the cells and dramatically reduce the life of your cells. If you do accidentally discharge them below 3.00V per cell, leave them for 30 minutes and if the voltage recovers to over 3.30V per cell then they should be OK to use them again. If they do not recover to at least 3.00V per cell then I’m afraid you have damaged them and they should be disposed of (Please see below as the correct method of disposal).
- Do not charge dissimilar or un-matched packs in series or parallel with any difference in cell type, cell capacity, manufacturer, age, pack capacity or charge state (+/- 0.03V per cell). If in any doubt, charge them separately.
- Do not charge any pack containing one or more damaged or swollen/puffed cell as there is a high risk of a fire.
Disposing of Lithium Polymer Cells
Discharge the battery as normal but this time to 3.00V/Cell. Then place a high resistive load (e.g. car sidelight) across it until the voltage has dropped to zero. Make sure the output wires are insulated, then wrap battery in a bag and place in normal rubbish bin.
Life of Lithium Polymer Batteries
This is a ’64 million Dollar’ question…. A Lithium Polymer battery needs to be replaced when it holds 80% or less of its capacity. If used at the maximum continuous discharge rate on every cycle and every charge is at 1C or greater and it’s used down to 3.00V per cell under load (when your LiPo compatible ESC cuts power to the motor) then don’t expect to get more then 40 or 50 cycles from your LiPo Pack. Please see our guide to prolonging the life of your LiPo’s.
Please Note. This is a guide only. Tips4U does not accept any liability whatsoever with regards to any injury or damage caused by advice contained within or not contained within this guide. Many thanks to www.4-Max.co.uk who provided this information.
Tips4U - How To Prolong The Life of Your LiPo Batteries
We're very enthusiastic about electric flight and we don't want people put off by their expensive LiPo cells only lasting a short number of cycles. We would like people to enjoy electric flight and continue to enjoy electric flight and here are our recommendations on how to get the most from your LiPo (Lithium Polymer) batteries. Lithium Polymer cells are often referred to as LiPo’s or Li-Poly’s and are a great advancement to increasing the performance and duration of electric flight. If used incorrectly LiPo cells will only give a short number of cycles and in the worst cases can result in a fire. Good quality cells, although costing more initially, will easily out perform (hold a higher voltage under load) and outlast the cheaper cells and therefore cost you less in the long term. Good quality cells are also safer in operation than the cheaper cells. As with all things in life, you get what you pay for.
Recommendations to get the most out of your LiPo cells.
- Purchase good quality battery packs. Cheap cells can be a bad investment with regards to life, performance and safety.
- Purchase a good quality charger designed specifically for charging Lithium Polymer cells. Make sure the charger has a display that will show the amount of energy that is put back into your packs in terms of “mAh” and one that shows the voltage of the individual cells being charged. This is essential to monitoring and therefore adapting your use and charging of your batteries.
- Purchase a digital voltmeter. These can be obtained fairly cheaply and is an essential tool for checking your battery packs.
- Purchase a watt meter. Again this is an essential tool to measure currents, voltages under load and watts.
- Most modern good quality chargers now have built in cell balancing capability. Always use this feature and make sure you select the "Balance" program on your charger. Monitor the individual cell voltages during charging as this will give you an indication of the health of each cell within the pack.
- Aim to draw less then 60% of the maximum continuous rated current of your LiPo’s. If you draw less then 60%, your cells will last even longer.
- Avoid discharging more than 80% of the cells capacity. If you consistently put less than 80% back you will increase the life of your cells. Start with short flights and time them. Make a note of how many “mAh” you put back and divide the number of “mAh” by the minutes to get an approximate “mAh” per minute figure. Use this mAh/minute figure to calculate the number of minutes you can fly without going over the 80% figure.
- Do not fly until the ESC cuts power to your motor as this will seriously shorten the life of your LiPo's.
- Charge at 80% of the capacity of the LiPo. e.g. a 1000mAh pack should be charged at 800mAh (0.8Ah) or less. (1000mAh x 0.8 = 800mAh)
- Do not charge your packs below 10ºC/50ºF and definitely not below 0ºC/32ºF.
- Do not charge hot cells. Warm cells are OK, cool cells are best. Let hot cells cool before charging.
- Lithium Polymer cells do not have a “memory” unlike Ni-Cad’s and therefore they SHOULD NOT be cycled. Cycling will bring the voltage down to 3.00V per cell which will shorten the life of your battery.
- DO NOT “top up” your cells before flight. Measure the voltage. If it is above 4.1V per cell then just fly as you would normally and then charge. LiPo’s lose less than 1% of their capacity per month in storage. Apart from being unnecessary there is a chance of overcharging your cells which will damage them & possibly cause a fire.
- If you plan to store your LiPo cells for an extended period (over 1 month), discharge them as you would normally. Then charge them to only 3.80V/3.85V per cell.
- If you discharge your LiPo's down to 3.30V per cell or less (no Load) you will damage them and shorten their life.
- If you deeply discharge LiPo's below 2.50V per cell you will severely damage them and therefore severely shorten their life and may even destroy them
Please Note. This is a guide only. Tips4U does not accept any liability whatsoever with regards to any injury or damage caused by advice contained within or not contained within this guide. Many thanks to www.4-Max.co.uk who provided this information
Tips4U - Which Loctite Threadlock colour to use
Here at Tips4U we thought it would be useful to explain the different strengths of thread locking glue that might be used when building or repairing Remote Control Vehicles, especially Helicopters. Loctite use a colour coding technique to differentiate between the strengths of their different products.
Here is all you need to know about the difference in Red, Blue, Green and Purple Threadlockers
From heavy industrial equipment to delicate electronic components, LOCTITE® Threadlockers dramatically increase the reliability of threaded fasteners.
- Locks against vibration & thermal expansion
- Seals against corrosion & leakage
- Reduces costs - Primerless & oil tolerant
- High temperature performance
Removable & serviceable in every color
Easy disassembly with hand tools when using Low and Medium Strength formulas. High strength red formulas may be disassembled with localized heat and hand tools.
|
RED THREADLOCKER  High Strength, High Temperature Threadlocker Permanently lock and seal threaded fasteners up to one-inch in diameter. Red LOCTITE Threadlockers are designed for high strength and high temperature applications. Various Products: High Temperature Featured Threadlockers: LOCTITE 272 Red Threadlocker High Strength Featured Threadlockers: LOCTITE 263 Red Threadlocker LOCTITE 268 Stick Red Threadlocker Features:
Ideal for:
|
|
BLUE THREADLOCKER 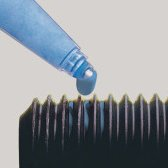 Medium Strength, Removable Threadlocker Fill spaces between threads to produce a secure one-piece assembly that will not loosen under stress, but can be removed with hand tools. Featured Products: LOCTITE 248 Stick Blue Threadlocker LOCTITE 243 Blue Threadlocker Features:
|
|
PURPLE THREADLOCKER 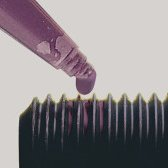 Low Strength, Easily Removable Threadlocker for Small Threads LOCTITE® 222™ Purple Threadlocker prevents loosening from shock or vibration, but also allows for simple, hand-tool disassembly without shearing the screw. Features:
|
|
GREEN THREADLOCKER  Low Strength, Wicking Grade Threadlocker for Pre-assembled Fasteners Green color, removable with heat and hand tools, for preassembled fasteners, instrumentation screws, electrical connectors, carburetors and fasteners. Featured Products: LOCTITE 220 Wicking Grade Blue Threadlocker LOCTITE 290 Wicking Grade Green Threadlocker Features:
|